
In today’s fast-paced digital world, efficient browsing is essential. With numerous tabs open at once, managing your online tasks can become overwhelming. Google’s Chrome browser offers a powerful feature called Tab Groups, which allows you to organize, group, and save tabs, making your browsing experience more streamlined and productive. In this article, we’ll guide you through creating and saving tab groups in Chrome, ensuring you get the most out of this handy feature.
What Are Tab Groups?
Tab Groups is a feature in Chrome that lets you group multiple tabs together. Each group can be given a name and color, making it easy to identify and manage related tabs. This feature is particularly useful for organizing tasks, projects, or topics, helping you keep your browser tidy and efficient.
Creating Tab Groups
Step 1: Open Chrome and Start Browsing
Begin by opening Google Chrome and browsing as you normally would. Open the tabs you need for your work, research, or leisure.
Step 2: Create a New Tab Group
To create a new tab group, follow these steps:
- Right-Click on a Tab: Right-click on the tab you want to add to a group.
- Select “Add Tab to New Group”: From the context menu, select “Add tab to new group.” A colored dot will appear next to the tab, indicating it is now part of a group.
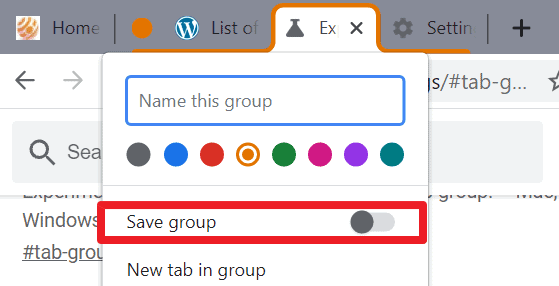
Step 3: Name and Color Your Group
After creating a new group, you can customize it:
- Right-Click on the Group Dot: Right-click on the colored dot next to the grouped tab.
- Name Your Group: Enter a name for your group to easily identify it.
- Choose a Color: Select a color for your group. This color-coding helps visually distinguish between different groups.
Step 4: Add More Tabs to the Group
You can add more tabs to your group by:
- Drag and Drop: Drag a tab and drop it into an existing group.
- Right-Click and Add: Right-click on a tab, select “Add tab to group,” and choose the group you want to add it to.
Managing Tab Groups
Expand and Collapse Groups
To keep your browser organized, you can collapse and expand tab groups:
- Click on the Group Name or Dot: Click on the group name or the colored dot next to it to collapse or expand the group. This action hides or shows all tabs within the group.
/cdn.vox-cdn.com/uploads/chorus_asset/file/25319952/Screenshot_2024_03_05_at_3.22.38_PM.png)
Move Groups
You can move entire tab groups within the tab bar:
- Drag the Group: Click and hold the group dot, then drag the group to your desired position on the tab bar.
Ungroup Tabs
If you no longer need a tab in a group, you can ungroup it:
- Right-Click on the Tab: Right-click on the tab you want to remove from the group.
- Select “Remove from Group”: Choose “Remove from group” from the context menu.
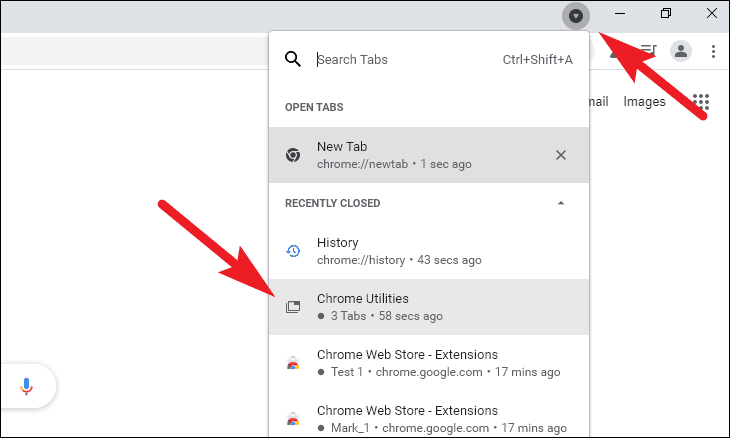
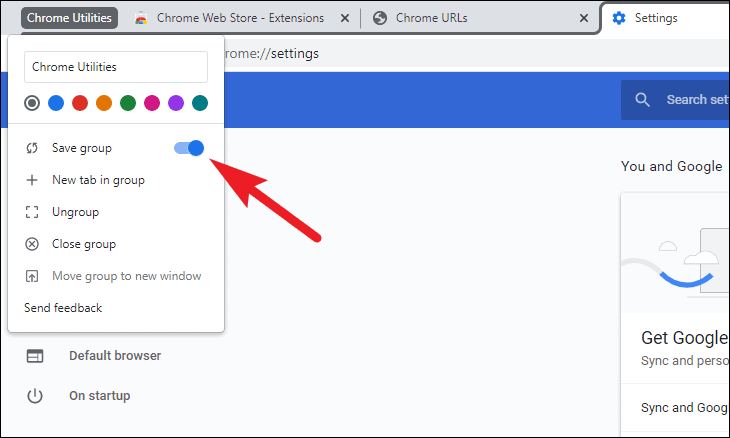
Saving Tab Groups
One of the most powerful aspects of Chrome’s Tab Groups is the ability to save them, preserving your groups across sessions.
Step 1: Ensure Chrome Sync Is Enabled
To save tab groups, you need to have Chrome Sync enabled:
- Open Chrome Settings: Click the three-dot menu in the upper right corner of Chrome and select “Settings.”
- Sign In to Chrome: If you’re not signed in, sign in with your Google account.
- Enable Sync: Ensure sync is turned on for tabs by clicking on “Sync and Google services” and making sure the “Open tabs” option is enabled.
Step 2: Close and Reopen Chrome
Once Chrome Sync is enabled, your tab groups will be saved automatically. When you close and reopen Chrome, your tab groups will be restored.
Also Read: How to Back Up Google Messages: A Comprehensive Guide
Additional Tips and Tricks
Pin Tabs
For frequently used tabs, consider pinning them:
- Right-Click on a Tab: Right-click on the tab you want to pin.
- Select “Pin”: Choose “Pin” from the context menu. Pinned tabs are smaller and always stay on the left side of the tab bar.
Use Keyboard Shortcuts
Chrome offers keyboard shortcuts to make managing tab groups even faster:
- Create a New Tab Group: Press
Ctrl + Shift + E. - Toggle Collapse/Expand Group: Press
Ctrl + Shift + 5.
Conclusion
Chrome’s Tab Groups feature is a game-changer for anyone looking to organize their browsing experience. By creating, managing, and saving tab groups, you can keep your tabs tidy, improve productivity, and reduce clutter. Whether you’re working on multiple projects, conducting research, or simply trying to keep your personal and professional browsing separate, Tab Groups in Chrome can make your life easier. Enable Chrome Sync to ensure your groups are saved across sessions, and you’ll never have to worry about losing your organized tabs again. Happy browsing!