


In today’s digital age, privacy is paramount. With the vast amount of personal information shared on social media platforms like Facebook, it’s crucial to know how to protect your privacy. Whether you’re concerned about data security or simply want to keep your personal life private, this guide will walk you through the steps to make your Facebook account private.
1. Understanding Facebook account private Settings
Before diving into the steps, it’s essential to understand the basics of Facebook’s privacy settings. Facebook offers various settings to control who can see your posts, personal information, and friend list. By adjusting these settings, you can significantly enhance your privacy.

2. Accessing Privacy Settings
To begin, log in to your Facebook account private and follow these steps:
- Click on the downward-facing arrow in the top-right corner of the Facebook homepage.
- Select “Settings & Privacy” from the dropdown menu.
- Click on “Settings.”
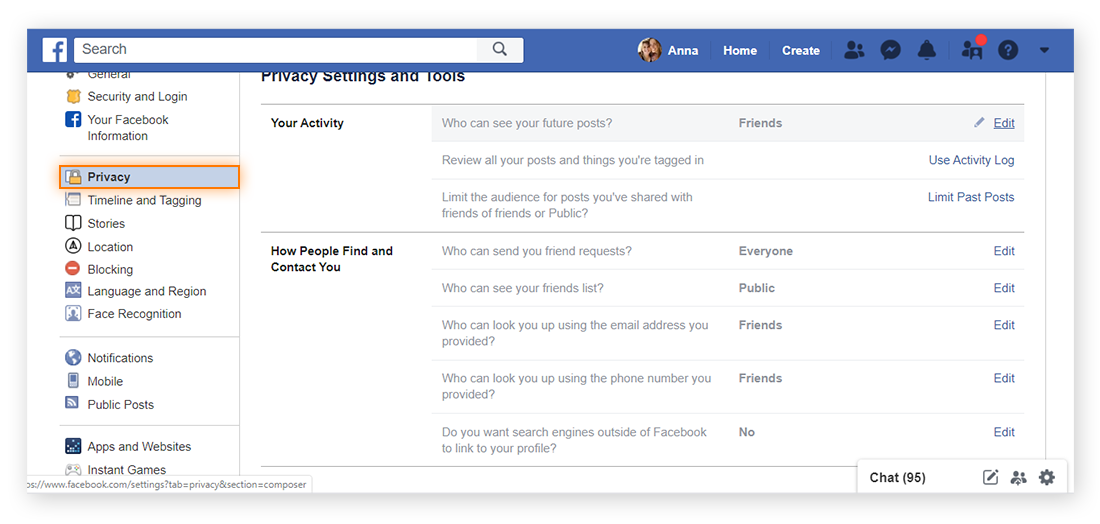
Once you’re in the Settings menu, you’ll see several options on the left-hand side, including “Privacy.”

3. Adjusting Privacy Settings
Under the Privacy section, you’ll find various settings to customize who can see your information and posts. Here are the crucial settings to adjust:
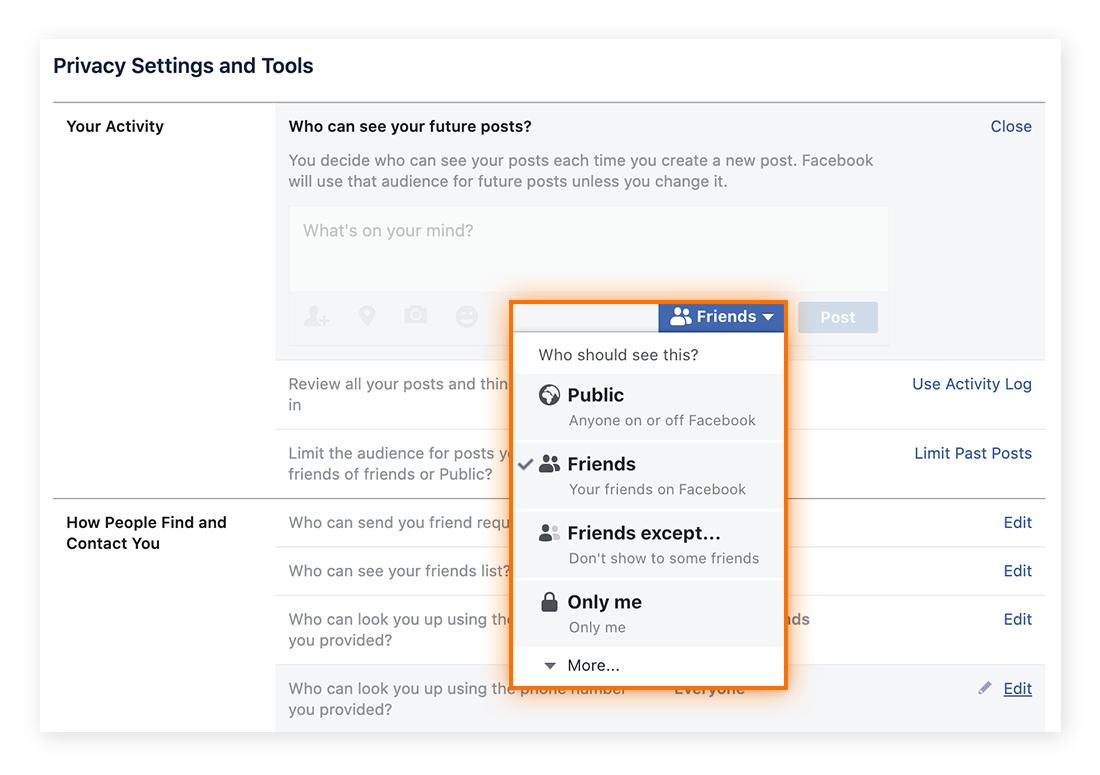
- Who Can See Your Future Posts: Click “Edit” next to this option and select “Friends” or “Only me” to limit the visibility of your future posts.
- Limit Past Posts: This option allows you to change the visibility of your old posts. Click “Limit Past Posts” to make your past posts visible only to your friends.
- Who Can See Your Friend List: Click “Edit” next to this option and choose “Friends” or “Only me” to hide your friend list from strangers.
- Who Can Look You Up Using the Email Address You Provided: Click “Edit” and choose “Friends” or “Only me.”
- Who Can Look You Up Using the Phone Number You Provided: Click “Edit” and select “Friends” or “Only me.”
- Do You Want Search Engines Outside of Facebook to Link to Your Profile: Toggle this option off to prevent search engines from linking to your profile.

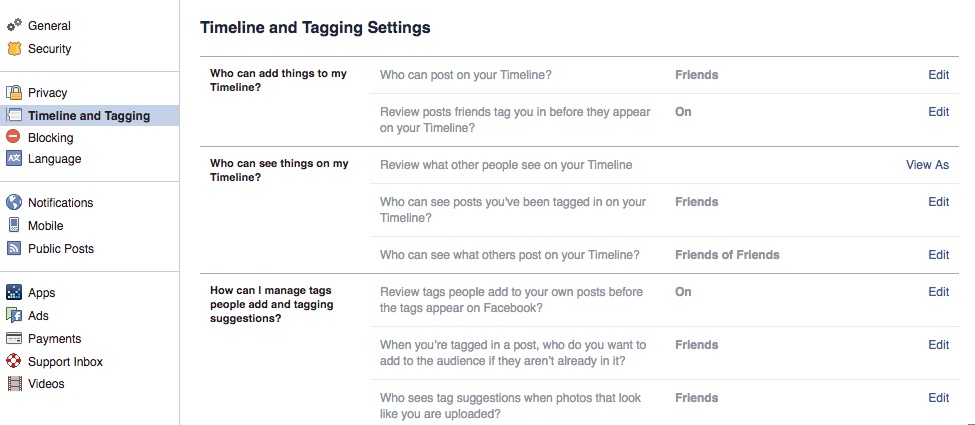
Next, navigate to the “Timeline and Tagging” section in the Settings menu. Here, you can manage who can post on your timeline and who can see posts you’re tagged in.
- Who Can Post on Your Timeline: Select “Friends” or “Only me.”
- Who Can See What Others Post on Your Timeline: Choose “Friends” or “Only me.”
- Review Posts You’re Tagged In Before the Post Appears on Your Timeline: Toggle this setting on to review tagged posts before they appear on your timeline.
- Review Tags People Add to Your Posts Before the Tags Appear on Facebook: Toggle this setting on to review tags before they appear on your posts.

5. Managing Profile and Tagging Visibility
In the “Profile and Tagging” section, you can control the visibility of specific profile information:
- Who Can See Your Birthday: Click “Edit” and choose “Friends” or “Only me.”
- Who Can See Your Hometown: Click “Edit” and select “Friends” or “Only me.”
- Who Can See Your Current City: Click “Edit” and choose “Friends” or “Only me.”
6. Securing Your Account with Two-Factor Authentication
Enhancing your privacy also involves securing your account. Enable two-factor authentication (2FA) for added security:
- Go to the “Security and Login” section in the Settings menu.
- Scroll down to “Two-Factor Authentication” and click “Edit.”
- Follow the prompts to set up 2FA using your phone number or an authentication app.
7. Reviewing App and Website Permissions
Facebook account private often integrates with various apps and websites, which can access your data. To manage these permissions:
- Go to the “Apps and Websites” section in the Settings menu.
- Review the list of connected apps and websites.
- Click “Remove” next to any app or website you no longer use or trust.
Also Read: How to Delete Photos from Google Photos
8. Controlling Ad Preferences
Facebook account private uses your data to show targeted ads. To manage your ad preferences:
- Go to the “Ads” section in the Settings menu.
- Click on “Ad Settings.”
- Adjust the settings for “Ads based on data from partners,” “Ads based on your activity on Facebook Company Products that you see elsewhere,” and “Ads that include your social actions.”
9. Managing Public Posts
If you’ve ever made a public post, it’s accessible to anyone on or off Facebook. To manage public post visibility:
- Go to the “Public Posts” section in the Settings menu.
- Adjust the settings for “Who Can Follow Me” and “Public Post Comments” to “Friends” or “Only me.”
10. Regularly Reviewing Privacy Settings
Facebook frequently updates its privacy policies and settings. Regularly review your privacy settings to ensure they align with your preferences. Set a reminder to check your settings every few months.
Conclusion
Protecting your privacy on Facebook is crucial in today’s digital world. By following these steps, you can significantly enhance your privacy and control who can see your information. Regularly reviewing and updating your privacy settings will help you stay ahead of any changes and maintain your desired level of privacy on the platform.